
Human serum and plasma rarely play nice with multiplex cytokine panels. Targets span orders of magnitude; matrix effects shift signals; and a single dilution that saves abundant markers can bury low-abundance cytokines below LLOQ. The practical question isn't "Can we multiplex?" It's how to choose dilutions—and when to split panels—so decision-critical analytes remain reportable, batches stay comparable, and scarce samples aren't burned on avoidable reruns. This guide centers on Luminex xMAP as the primary workflow and offers fit-for-purpose rules that translational biomarker teams can actually run.
Who This Resource Is For
Typical study scenarios
- Translational biomarker studies with mixed-abundance cytokines and chemokines
- Discovery-to-validation projects moving from broad screening to fit-for-purpose panel design
- Longitudinal or multi-batch studies where comparability matters
- Studies with limited sample volume and little room for reruns
Key questions addressed on this page
- Why do analytes in the same multiplex cytokine panel require different dilutions?
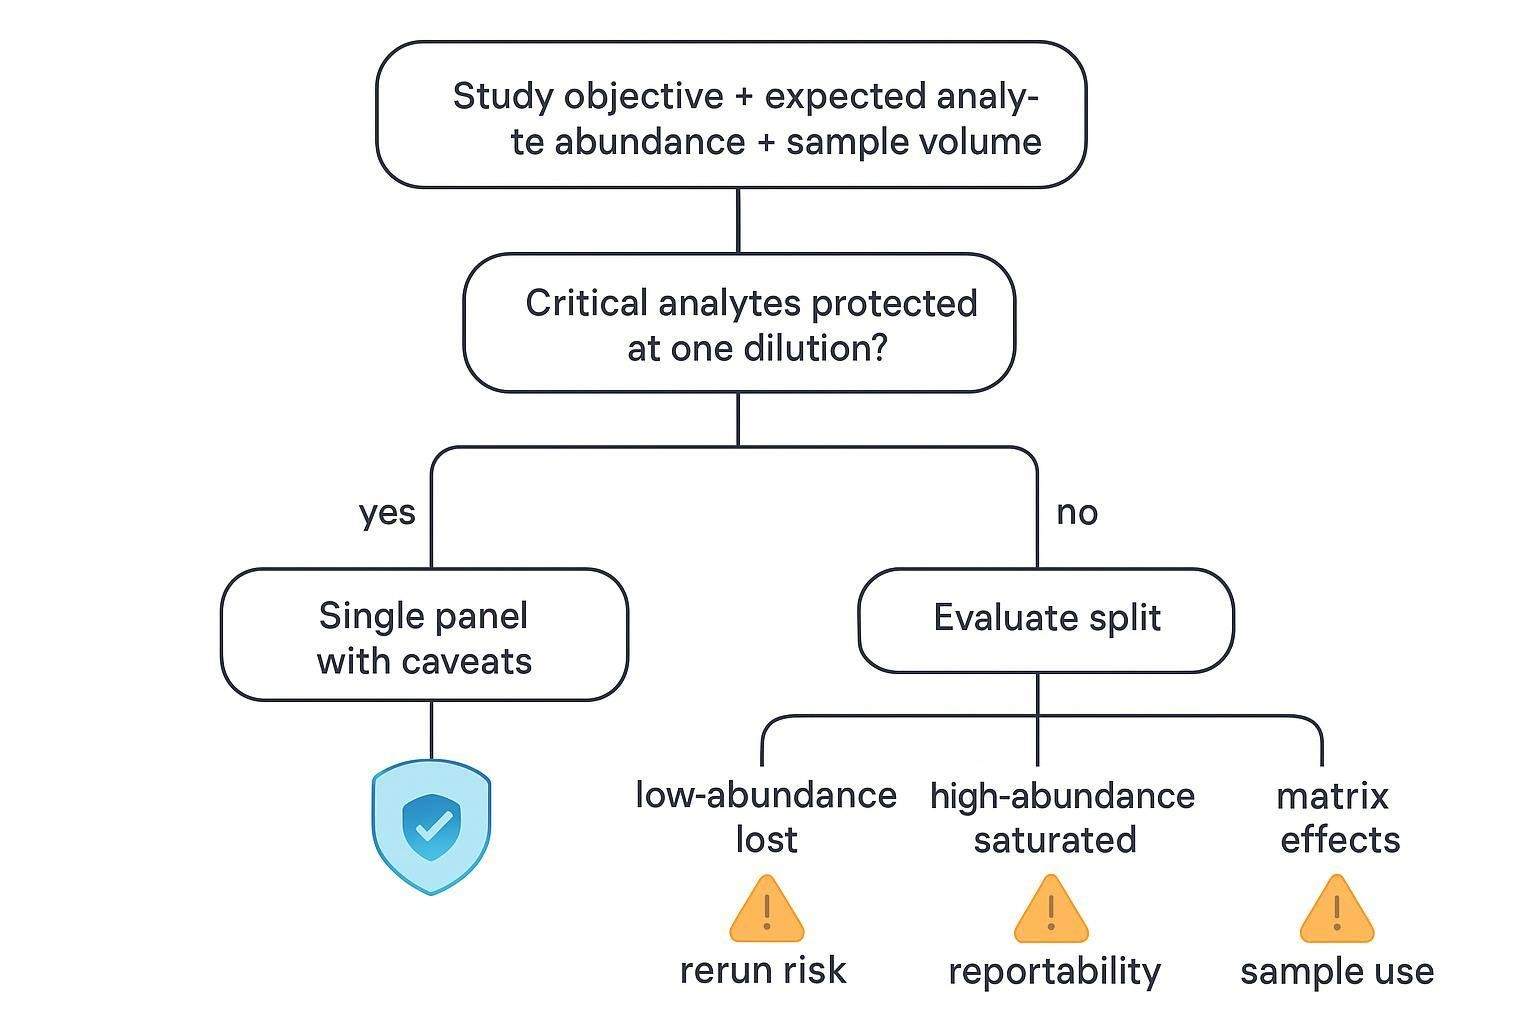
- When is a single panel acceptable, and when should the panel be split?
- How do dilution choices affect sensitivity, reportability, and sample use?
- What should be predefined before final panel lock?
Why Different Dilutions Create a Panel Design Problem
Mixed abundance is common in multiplex cytokine studies
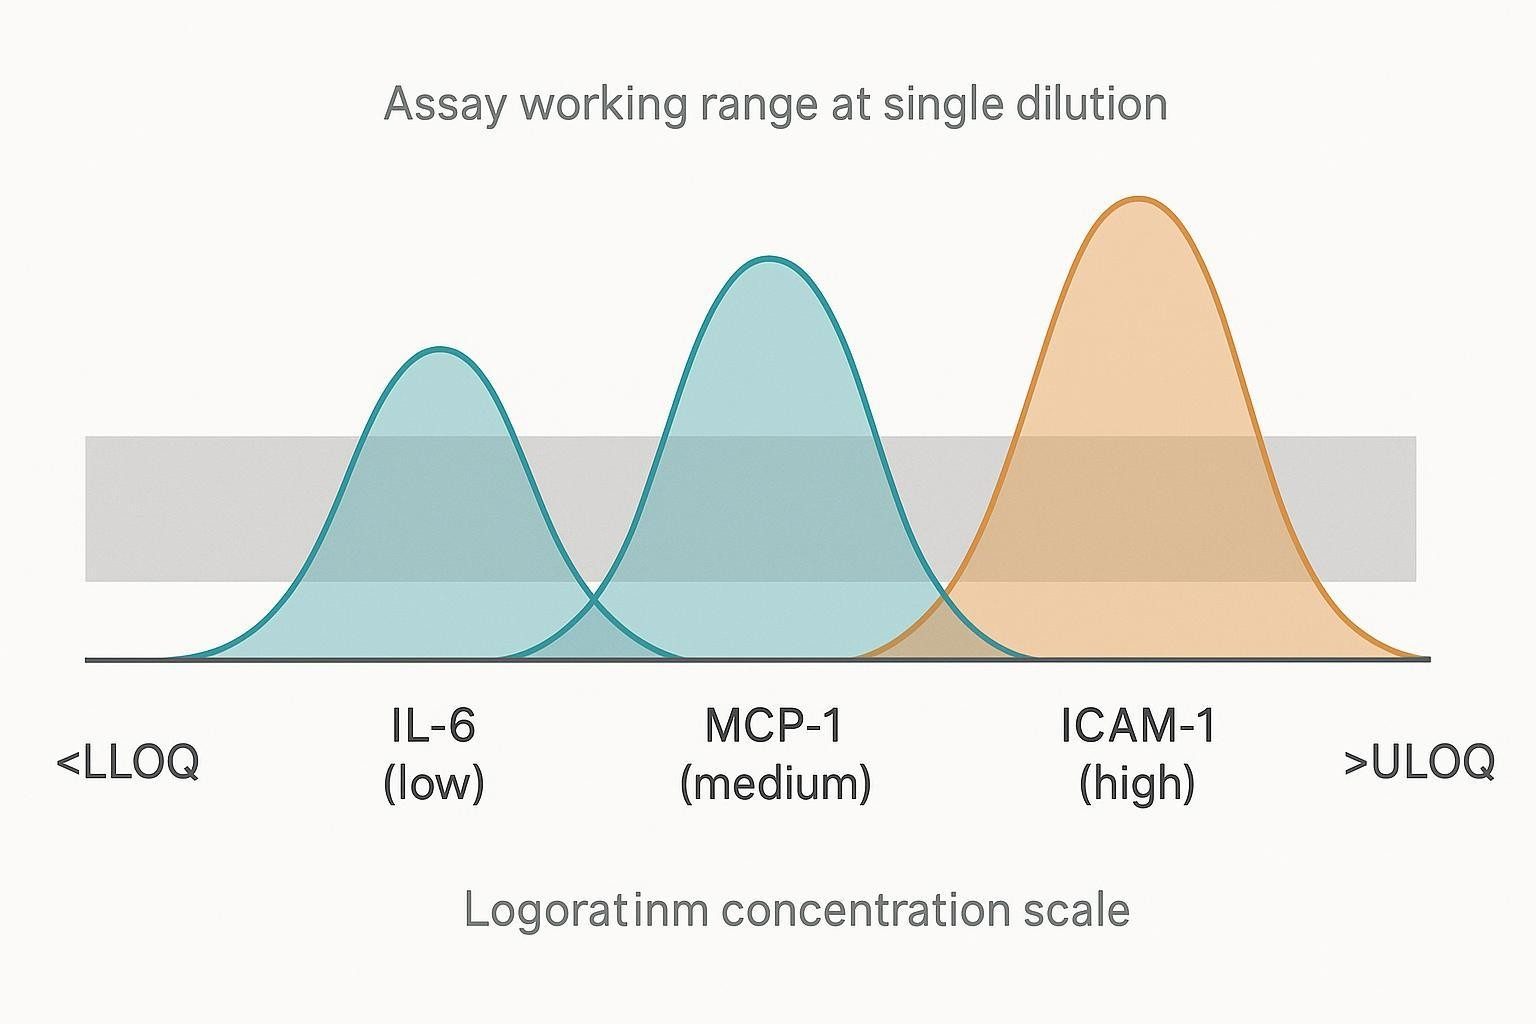
In the same serum or plasma cohort, cytokines and chemokines can sit at dramatically different baseline concentrations and respond very differently to disease biology or intervention. That spread means a single dilution often forces a trade-off: dilute enough to keep high-abundance proteins inside the standard curve, and you may push low-abundance cytokines below the LLOQ; dilute conservatively to protect sensitivity, and you risk saturating abundant targets (or running into nonlinearity near the top end).
Why this matters for study outcomes
When dilution is mismatched to the biology, the impact shows up where it hurts most: decision-critical analytes become non-reportable, teams burn limited volume on predictable reruns, and results become harder to compare across cohorts, time points, and batches. The downstream effect is a report that contains more qualifiers, more censored values, and more interpretation risk than the study plan anticipated.
Common contexts where this issue appears
You'll see dilution conflict most often in human serum or plasma studies with wide biological variability, but it also shows up in stimulated cell-culture supernatants where responses span large gradients. Longitudinal designs can amplify the problem because baseline and post-treatment distributions often shift over time, and mixed-purpose panels compound it by forcing exploratory markers to share conditions with decision-grade readouts.
What Determines Dilution Requirements
Expected analyte abundance
Expected abundance is the first driver of dilution choice. Baseline levels can differ by orders of magnitude across targets, and disease biology or stimulation can shift specific analytes upward (or downward) enough to move them from mid-range into saturation. If you anticipate large fold changes between groups or time points, you should treat dilution as a study-design variable—not a kit default.
Matrix effects
Matrix effects are the second driver, and they're often what makes "good on paper" ranges fail in real samples. Serum and plasma contain binding proteins, lipids, and endogenous antibodies that can raise background or suppress signal, effectively reducing practical sensitivity. Recovery and dilution linearity (parallelism) can also vary by analyte and sample type, so a dilution that behaves well in buffer or a different matrix may not behave the same way in your intended specimens.
Assay and panel characteristics
Assay design matters too. Antibody pairs differ in affinity and background, which changes the effective working range you actually get in multiplex. Curve-fitting and calibrator behavior can also favor some analytes over others, and multiplexing itself can introduce subtle interactions that shift performance compared with singleplex expectations. That's why pilot work should evaluate the full panel configuration, not just individual analytes in isolation.
Study-level constraints
Finally, operational constraints shape what's realistic. Available per-subject volume limits how many dilutions, replicates, and confirmatory reruns you can afford, and cross-batch comparability requires space for controls and (when applicable) bridge samples. Just as important, you need a predefined policy for how you'll handle results above the ULOQ—because that policy directly affects whether a single-dilution design is acceptable.
Signs That One Dilution May Not Be Enough
Signals from feasibility or pilot work
- Several abundant analytes cluster near the upper limit
- Several low-abundance analytes fall below LLOQ
- Extrapolated values appear frequently at one end of the range
- Overall panel performance looks acceptable, but key analytes do not perform adequately
Study patterns that increase risk
- Decision-critical analytes sit at the low or high edge of the workable range
- The intended matrix differs from the matrix used in early feasibility work
- Biological response magnitude is highly uneven across analytes
- Baseline and post-treatment samples are expected to differ substantially
Questions to ask before locking the design
- Which analytes are must-report versus exploratory?
- What concentration behavior is expected in this exact matrix?
- How much sample can be allocated to repeats and contingencies?
- What level of non-reportable data is acceptable for the study objective?
When a Single Panel Is Still Reasonable
Situations that support a one-panel approach
- Most analytes remain quantifiable under one workable dilution
- Marginal analytes are exploratory rather than decision-critical
- Sample volume is too limited to support multiple panel runs
- The study prioritizes broad screening over strict analyte-level optimization
Trade-offs to acknowledge
- Some targets may lose sensitivity or upper-range usability
- Data completeness may vary by analyte
- Out-of-range handling rules must be predefined
How to make a one-panel strategy more defensible
- Optimize around decision-critical analytes
- Confirm performance in the actual intended matrix
- Use pilot samples that reflect expected biological extremes
- Define rerun rules before study launch
When to Split a Multiplex Cytokine Panel
Strong reasons to split
- Critical analytes require incompatible dilution conditions
- Key low-abundance markers are lost at the dilution needed for abundant targets
- Saturation of abundant targets creates predictable rerun burden
- The study requires higher confidence in reportability and interpretability
Common split strategies
- Split by abundance tier
- Low-abundance analytes in one panel
- Medium- or high-abundance analytes in another
- Split by study purpose
- Core decision markers separated from exploratory markers
- Split by sample behavior
- Different panel logic for baseline versus stimulated samples when justified
- Split by technical compatibility
- Poorly compatible analytes separated from the main multiplex set
What splitting can improve
- Better quantifiability for critical analytes
- Fewer avoidable reruns
- Clearer reporting boundaries
- Better fit-for-purpose design
What splitting can cost
- Greater sample consumption
- More planning and QC complexity
- More complicated data integration
- Additional operational burden across batches
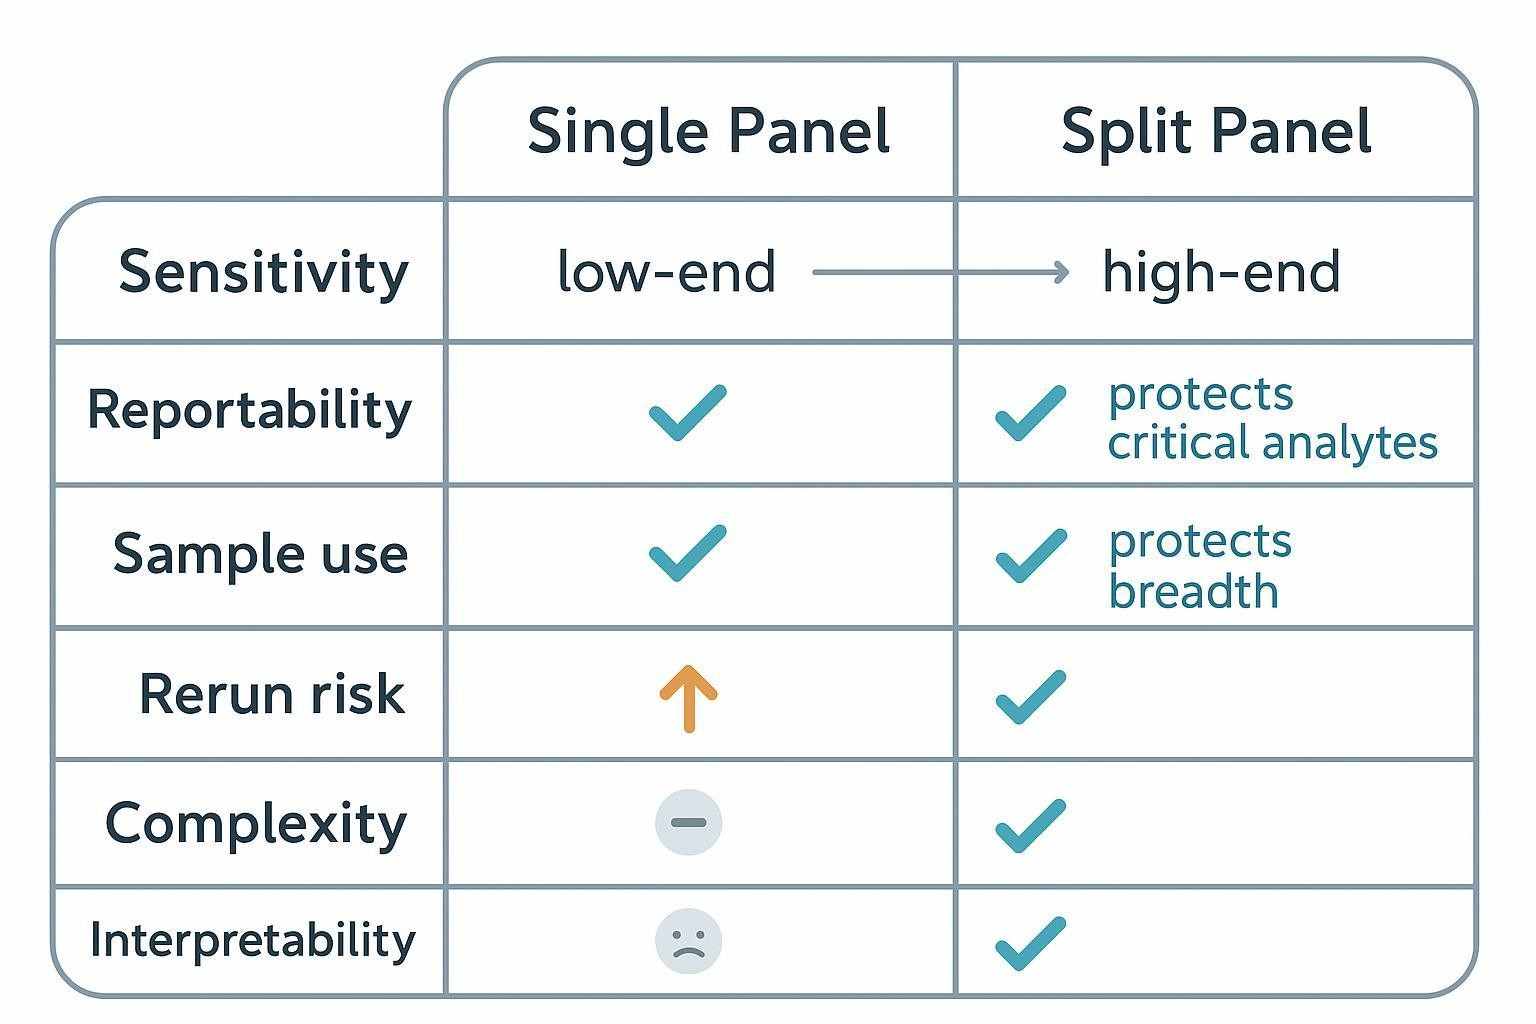
| Dimension | Single Panel (one dilution) | Split Panel (tiered dilutions) |
|---|---|---|
| Sensitivity | Protects breadth; risks low-end censoring | Optimizes low-end for critical analytes |
| Upper range | Risk of saturation for abundant targets | Higher headroom for abundant markers |
| Reportability | Uneven across analytes | Higher and more even for priority markers |
| Sample use | More parsimonious | Higher volume per subject (controls + contingencies) |
| Rerun risk | Predictable reruns if ranges are mismatched | Lower reruns when ranges are well matched |
| Complexity | Simpler setup and data integration | More planning, plate maps, and QC to manage |
| Interpretability | Mixed strength by analyte | Clearer decision-grade vs exploratory outputs |
A Practical Decision Framework for Multiplex Cytokine Panel Design
Step 1: Define the study objective
Clarify whether you're doing exploratory profiling, mechanistic hypothesis testing, patient stratification, longitudinal monitoring, or go/no-go biomarker decision support. Objectives drive tolerance for missingness and acceptable trade-offs.
Step 2: Rank analytes by decision value
Segment the list into must-report analytes, important-but-secondary markers, and exploratory-only targets. Protect the must-report tier first.
Step 3: Estimate expected concentration behavior
For the intended matrix (human serum/plasma here), map low/medium/high expectations and anticipated fold changes after stimulation, disease progression, or intervention. Capture matrix-specific shifts that could squeeze usable range.
Step 4: Map operational constraints
Document per-subject sample volume, replicate and control plan, rerun budget, batch structure, and reporting expectations. Treat reruns as a design variable, not an afterthought.
Step 5: Choose the least risky design
Use one panel when compromise doesn't materially affect critical analytes. Split when one dilution would undermine reportability or interpretation for decision-critical targets.
How Sample Volume Changes the Decision
When volume is tight, every extra panel or rerun consumes precious material. Splitting may improve fit-for-purpose performance but increases sample use. Plan control placement, bridge materials, and contingencies early. Ask yourself: How much volume is required for the initial run, controls, repeats, and predefined reruns? Are all analytes necessary now, or can you stage a core panel plus extension? Is better quantification of fewer markers worth more than broad but weaker coverage?
Design principles for precious samples: Protect decision-critical readouts first. Remove low-value analytes that force unhelpful compromises. Treat rerun policy as part of panel design, not post hoc troubleshooting.
How to Use Pilot Data Before Final Panel Lock
What pilot work should test
- Dynamic range coverage at the proposed dilution(s)
- Matrix-specific signal behavior
- Frequency of ULOQ outcomes
- Reproducibility of key analytes
- Whether splitting materially improves reportability
What good pilot evidence looks like
A strong pilot shows that critical analytes are quantifiable in the intended matrix, the chosen dilution strategy works across representative samples, trade-offs between breadth and reportability are explicit, and the design doesn't create excessive rerun burden. In Luminex serum/plasma work, pilot dilutions should be chosen from kit- and matrix-specific feasibility data rather than assumed from a universal default. For regulated or fit-for-purpose studies, acceptance criteria for bias, precision, and dilution performance should be predefined with reference to applicable FDA/ICH expectations.
Practical pilot protocol (serum/plasma; Luminex xMAP)
- Select 8–12 representative samples spanning expected extremes (baseline vs post-treatment; low/high responders); include matrix-matched blanks and QCs.
- Test a dilution series (e.g., 1:2, 1:4, 1:10, 1:20, 1:50, 1:100) with appropriate sample diluent; pre-clarify serum/plasma by high-speed spin.
- For each analyte and dilution, record reportability (within LLOQ–ULOQ), %CV for replicates, and back-calculated bias near limits.
- Evaluate dilution integrity/parallelism by diluting high controls/samples into range and checking acceptable bias/CV.
- Decide: As a practical decision rule, consider a split strategy when a substantial fraction of analytes are consistently out of range at the best compromise dilution, or when any must-report analyte is not reliably reportable under that condition.
Tip: If you need a human-focused, ready-to-run set to accelerate pilots, options such as Luminex Multiplex Cytokine Panel Service , Human Cytokine Multiplex Testing Service , or Human Inflammation Luminex Panel can provide practical starting configurations and analyte coverage that map well to serum/plasma use.
Reporting Implications of the Design Choice
Reporting challenges in a compromised one-panel design
- Uneven completeness across analytes
- More censoring at the low or high end
- Greater need to distinguish descriptive from decision-grade outputs
Reporting considerations in a split-panel design
- Better analyte-level interpretability
- Stronger fit-for-purpose justification
- Clearer rationale for panel allocation and rerun logic
What should be predefined before study start
- Final analyte list by panel
- Dilution factor(s)
- Rerun triggers
- Handling rules for ULOQ values
- Matrix assumptions and batch plan
Note on cross-batch comparability: Plan bridge samples and overlapping controls across plates/batches; monitor trends (e.g., Levey–Jennings) and apply predefined normalization approaches where justified. This upfront discipline reduces ambiguity when studies span months or sites.
Common Design Mistakes to Avoid
Designing around panel size rather than study decisions
A larger panel isn't always a better panel. Critical analytes should anchor the design strategy.
Assuming default vendor dilution is fit for purpose
Default conditions may not match the study matrix or biology. Context-specific confirmation is usually needed.
Treating all analytes as equally important
Some analytes directly support the study decision; others may be informative but not design-defining.
Ignoring future rerun burden
A panel that technically runs may still be operationally inefficient. Preventable reruns should be treated as a design issue.
Separating assay setup from reporting policy
Panel design directly affects data usability. Reporting rules should influence design choices early.
Pre-Study Checklist
Scientific checklist
- Define the biological question
- Rank analytes by decision importance
- Estimate expected abundance by matrix and timepoint
- Identify likely problem analytes
Analytical checklist
- Review range compatibility
- Compare one-panel versus split-panel feasibility
- Confirm performance in representative samples
- Define rerun and quantification rules
Operational checklist
- Calculate sample allocation
- Reserve volume for controls and contingencies
- Align panel design with batch planning
- Document assumptions before launch
FAQ
Do different dilutions always mean the panel should be split?
No. The key is whether one dilution compromises decision-critical analytes. If not, a single panel may be acceptable with predefined handling of out-of-range values.
Is one broad panel better for exploratory work?
Sometimes. If data remain interpretable and decision-critical markers are protected, a broad single panel can be efficient for discovery.
Can split panels reduce reruns?
Yes. When reruns are driven by predictable range failures (low-end censoring or high-end saturation), splitting lowers rerun risk at the cost of more upfront planning and sample use.
How should analytes be prioritized when sample volume is limited?
Rank by decision value. Protect must-report markers first and consider a core-plus-extension approach for the rest.
Should pilot work be done before final panel lock?
In most mixed-abundance serum/plasma studies, yes—especially when matrix effects, low volume, or high-stakes reporting are involved.
Where does Luminex xMAP fit versus other platforms?
Luminex suits broad multiplexing with flexible panel design and modest volumes. MSD can offer wider dynamic range in some contexts; Simoa is ideal when ultra-low abundance single targets drive decisions; Olink favors discovery with relative quantification. Choose based on objective, abundance, and matrix behavior.
References:
- FDA. Bioanalytical Method Validation Guidance for Industry (2018). https://www.fda.gov/files/drugs/published/Bioanalytical-Method-Validation-Guidance-for-Industry.pdf
- ICH M10 Bioanalytical Method Validation (Step 5, 2022). https://www.ema.europa.eu/en/documents/scientific-guideline/ich-guideline-m10-bioanalytical-method-validation-step-5_en.pdf
- Bio-Rad. Bio-Plex Pro Human Cytokine Quick Guide (10000076326). https://www.bio-rad.com/sites/default/files/webroot/web/pdf/lsr/literature/10000076326.pdf
- R&D Systems (Bio-Techne). Luminex Assay Users Guide. https://resources.bio-techne.com/bio-techne-assets/images/literature/br-luminex-assay-users-guide.pdf
- MilliporeSigma MILLIPLEX Protocols (examples with precision targets): https://www.sigmaaldrich.com/deepweb/assets/sigmaaldrich/product/documents/255/533/protocol-hcytomag60k-ms.pdf; https://www.sigmaaldrich.com/deepweb/assets/sigmaaldrich/product/documents/377/585/protocol-hmh334k-mk.pdf
- EQAPOL bead-array monitoring and standardization best practices (2024). https://pmc.ncbi.nlm.nih.gov/articles/PMC11246216/
- Cross-platform variability and normalization approaches in multiplex immunoassays. https://pmc.ncbi.nlm.nih.gov/articles/PMC3536905/; https://pmc.ncbi.nlm.nih.gov/articles/PMC7255915/
- Hook/prozone and interference in immunoassays (overview articles). https://pmc.ncbi.nlm.nih.gov/articles/PMC2812081/; https://pmc.ncbi.nlm.nih.gov/articles/PMC5655638/